Monday, May 29, 2017

This is what happens when you create a masculine layout with girl supplies

     Hi Scrappy Friends!  I'm back with something a bit different for my blog...a 9x12 layout.  I saw this on Inkie Quill's channel and figured I've give it a try for some variety.  I really ended up loving it.  For single 4x6 photos it was so much easier to not have as much white space to fill, and I think the layout looks more balanced.  It won't be something I completely change to, but I will definitely be incorporating some into my albums.  
     The other thing that's different about this layout, at least for my blog is that the photo is my boy, but the supplies are meant for a girl.  I used the Felicity Jane Caroline kit from April as the colors were perfect for the photo.  
     To make this more masculine I pulled in the blue/navy and grey elements to balance out the pink.  For me yellow is gender neutral so that worked week also.  I then pulled in some wood elements for another masculine touch.  Some mustard and seafoam Heidi Swapp Color Shine and I called it a day.
     I also wanted to share with you the glue I used to attach my wood elements...The Best Glue Ever.  I used my Embellie Gellie to pick them up, but look at how little glue I had to use.
     I also will be entering this layout into the challenge at Scrap The Boys.


SaveSave

Monday, May 22, 2017

A Delightful, Creative and Bohemian One Page Scrapbook Layout

     Hi Scrappy Friends!  I'm a bit late this morning, but I have another guest layout for the Use Your Stuff to share with you today. The challenge for this week is Bohemian with lots of rich patterns and embellishments.   I'll be very honest...this was really a challenge for me. I am generally a clean and simple girl so what I tried to combine the two styles and I think I did ok!
A layout of our little girl on her dedication day using products from American Craft, Carta Bella, Heidi Swapp, Crate Paper and Tim Holtz
     The base is American Crafts black textured yardstick.  I buy their big packs so I'm not running to the store every week for more base colors.  The patterned paper and embellishments are from the Carta Bella collection Amour. It's a very french collection and the rich patterns suited the theme well. 
     The doily base is from Amazon, and you'll probably see a ton of those on my layouts going forward as you have to buy them in packs of 1,000! White was too stark against the black background so I sprayed it with some Heidi Swapp Color Shine in Bush...it's my favorite girl color lately.  
    The layout is finished off with some of my homemade enamel dots,  gold color shine splatters, gold thicker title (by Crate Paper) and some Tim Holtz tiny word stickers.
   So tell me....did I mix enough to meet the theme!? 
SaveSave

Sunday, May 21, 2017

A sweet, quick, easy sibling one page layout

     Hi Scrappy Friends!  I'm back today sharing a layout I created of our son and daughter when she was just a newborn.  This photo of him just laying and staring at her just melts my heart.  While she doesn't lie still now he loves her even more.
     For this layout I used the Pink Paislee penpal collection. On the heart paper near the bottom though I also used some gesso to town down how bright the colors were since I wanted a soft feel since the picture is so sweet.   

     I also wanted to show you how The Best Glue ever solved a frew scrappy problems I ran into during creating this.  The photo above you can see how my tap runner lifted right up because of the dimension of my layers.  
     In the photos below you'll see I have some clear die cuts I wanted to use.  I used BGE on the clear leaves and see how you can't even see it!

     Well,  I better run - we need to leave for work/school in 45 minutes and no one is even out of bed yet!!!


Monday, May 15, 2017

How to create a sparkling one year old girl birthday scrapbook layout

     Hey Scrappy Friends!  I'm back today sharing another layout for the Use Your Stuff challenge blog. Our challenge this week was to make a metallic or sparkle layout.  What better way to use sparkle than on baby J's first birthday pictures.
How to create a sparking one year old girl birthday scrapbook layout
     I started with a sketch I found on PageMaps. it gave me the perfect base for what I wanted to include.  The large photos of obviously of J in her birthday outfit.  The two smaller photos are the cake her auntie made her and the flower we used to decorate inside of paper decorations.  
     The aqua cardstock base is from an old DCWV pack that I wish they still made.  I've been hoarding the last bits.  The patterned paper is Echo Park Birthday Wishes.  To make it metallic though I "painted" some of there cupcakes with Wink Of Stella in Clear and Light Green.
     I also added a splash of sequins around the page, and a glitter chipboard title. To finish it off I used glitter pens from Kaiser Craft and some Heidi Swapp Color Shine.
    I was really pleased with how this came out...it's one of those photos that you have such high hopes for because it's so special, and it's just perfect.  I hope you love what I've created, and as always...leave me a link with what you created and I'll be sure to comment.  


Sunday, May 7, 2017

National Scrapbook Day with Felicity Jane

     Hi Scrappy Friends!  I hope you had a wonderful National Scrapbook Day.  I only finished one layout, but I did an hour long live video on my Facebook page and that was great fun.
     The layout I completed was for several challenges.  I used a the national scrapbook day sketch from Scrapbook Generation combined with Victoria Marie's grid challenge.  I also used my March kit from Felicity Jane.

A grid layout created with the Felicity Jane Caroline Kit
     This is the first layout I made with my Felicity Jane kit, and I absolutely loved it.  The colors all matched so perfectly, and I was able to use their embellishments and some I made myself to created this adorable layout of our daughter.  
     The embellishment that I made myself was the tag.  I cut it from white cardstock and sprayed it with Blush Color Spray from Heidi Swapp.  I added a die cut from the kit and added some tiny words from Freckled Fawn, a punched heart and some enamel dots.  
    I really love how this turned out and can't wait to hear what you all think.  What did you do for National Scrapbook Day?


SaveSave

How To Safely Repair Your Children's Favorite Board Books

     Hey Scrappy Friends!  I'm here today with an off the page idea for your Best Glue Ever.  If you've had children, or even know a child, you know that every darn thing goes right in the mouth when the are smaller.  It's no different here at our house, and our little one chewed part of the cover off of one of our favorite books in a series.


     I wanted to repair the book, but how to do that in a child friendly way was stumping me.  Plain white glue didn't have enough hold.  Tape could be chewed off.  Crafting glues weren't safe if kiddo decided to have a snack again...enter the Best Glue Ever.
     Since the glue is non-toxic if baby girl decides to chew again I know I don't have to worry.  I applied a very thin line around the outside part that was lifted. When I say tiny...I really mean tiny.  It doesn't take much of this to get a great hold. 


     I then just let the book sit with the glue bottle on top for a little.  I'd say at most it sat an hour, and it didn't need that long I just happened to be cooking supper.  You also don't need to weight the items done, but since mine was soooo very bent I figured it couldn't hurt.


     And now look at this fabulous result!  One of our favorite books is almost as good a new.  Well, except for the teeth marks :-)


     I hope this gives you a new idea of how to use your Best Glue Ever, and saves your favorite story books.  Oh, and before I go....here's a picture of the culprit.  Until next time...stay crafty!


Saturday, May 6, 2017

Creative Top Ten All About My Favorites Scrapbook Layout

     Happy National Scrapbook Day Scrappy Friends! I have the distinct honor of running one of the challenges for this weekend over on the Victoria Marie Facebook Group.  The challenge I came up with was to create a project with your top ten current favorite things. 
     I thought this was going to be super easy right...I mean we all have things we love.  When I actually sat down to plan though...super hard.  Narrowing your whole life down to ten things!  If you'll notice though...work was not on the list...lol

   As per usual I started with a sketch...This one was from Creative Scrapper Volume Three.  The sketch had a huge amount of journalling on the right side, and I thought that was a great place for my top ten.  
     The paper on the right in from the Authentique collection all Favorite and was perfect for this theme.  The numbers and tiny word stickers are also from Authentique.  
       I didn't care for the photo on the other pieces from the collection though so I pulled out a 6x6 pad from My Minds Eye called Moments.  The scrappy challenge of this was though that it was white and the Authentique is cream.  Tim Holtz distress pads in Antique Linen to the rescue.  
     If you're not a member of the Victoria Marie group I hope that you'll consider joining for loads more inspiration and new scrappy friends.  

Monday, May 1, 2017

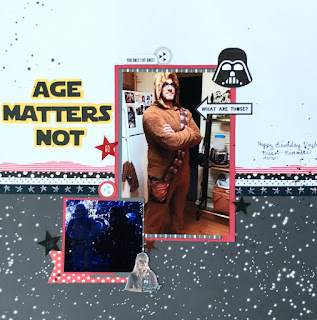
Creating A Unique Star Wars Birthday Scrapbook Layout

     Hey scrappy friends!  I'm here today with another guest post for the challenge blog Use Your Stuff. This time we were challenged to make something inspired by the Star Wars film.
      I had no trouble knowing exactly which photos I wanted to use on this one. The large photo is my brother-in-law on his birthday in the Chewbacca suit we bought him, and the bottom photo is some Storm Troopers from Star Wars night a the local zoo.
Star wars scrapbook layout featuring Simple Stories - Freckled Fawn - Heidi Swapp and the silhouette cameo
     So when I first thought about how to make this Star Wars themed beyond the photos I thought of the opening credits and the galaxy look.  The patterned paper on the bottom that gives that same look is from Simple Stories - Heart Collection.  I also used star washi from Heidi Swapp to try to tie in the Star Wars theme.  The rest is just various dollar washi I've picked up along the way with some Freckled Fawn embellishments thrown in.  Oh, and last but not least I found the sketch on pinterest.  It didn't lead back to a post, but the photo said it was from Sketchy Thursdays.
     For the really fun stuff though I just googled some Star Wars images and used the print and cut feature on my Silhouette Cameo. The title is a Master Yoda-esque quote that I cut with the Star Wars font in the color of the original title. 
     I hope this shows you how easy it is to combine your stash to get a great layout...even if the elements (love paper) aren't themed for the exact topic.  Leave me a link with what you create to enter the challenge and I'll be sure to come take a look!